-
Notifications
You must be signed in to change notification settings - Fork 15
arch_single_shared
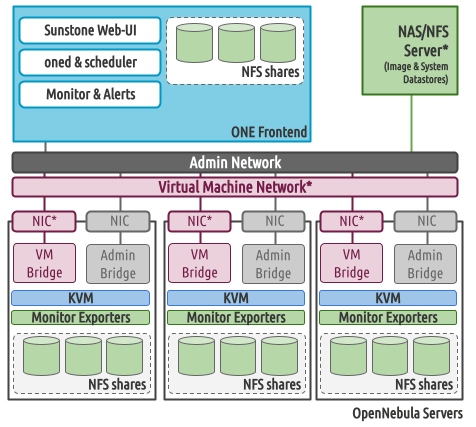
This scenario is a variation of the local storage configuration. Here, the storage for virtual machines (VMs) and the image repository are provided by an NFS/NAS server. Running VMs directly from shared storage can enhance the fault tolerance of the system in the event of a host failure, albeit with the drawback of increased I/O latency.
In this architecture the Front-end and hypervisors are deployed in the same flat (bridged) network.
This page briefly describes each component of the architecture and lists the corresponding configuration for automatic deployment.
For a step-by-step tutorial on deploying on this architecture, please see the OpenNebula documentation.
Note
The playbook assumes that the NFS server is already configured and available for the nodes where you will deploy your cloud.

The NFS/NAS server must be configured to export the datastore folders to the hosts in the OpenNebula cloud. In this example, the server shares the /storage/one_datastores directory, owned by UID 9869:
root@nfs-server:/# ls -ln /storage
total 0
drwxr-xr-x 2 9869 9869 6 Jun 26 17:55 one_datastores
Important
The shared directories MUST be owned by UID and GID 9869, since these are assigned to the OpenNebula oneadmin user during installation. If you need to change the UID/GID, run as root:
chown 9869:9869 /storage/one_datastores
You can change these values even if no user with this UID/GID exists on the system.
The shared folder must be available to all servers where OpenNebula will be deployed. The example /etc/exports file shown below shares the folder for the entire network where the servers reside:
# /etc/exports
#
# See exports(5) for more information.
#
# Use exportfs -r to reread

/storage/one_datastores 172.20.0.0/24(rw,soft,intr,async)
To configure the network, you can follow the relevant section in the Local Storage page of this wiki. The network configuration is identical: a flat (bridged) network where each host uses its main interface to connect to the VMs on the network.
This scenario uses the same configuration as the Local Storage page of this documentation. Please refer to that page for details on configuring the Front-end services or using your Enterprise Edition token.
The following snippet shows the configuration to use shared storage using the above NFS share (assuming the NFS server is at 172.20.0.1):
    ds: { mode: shared }

    fstab:
- src: "172.20.0.1:/storage/one_datastores"The following file shows the complete settings to install a single Front-end with two Hosts using shared storage:
---
all:
  vars:
    ansible_user: root
    one_version: '6.10'
    one_pass: opennebulapass

    vn:
      service:
        managed: true
        template:
          VN_MAD: bridge
          BRIDGE: br0
          AR:
            TYPE: IP4
            IP: 172.20.0.100
            SIZE: 48
          NETWORK_ADDRESS: 172.20.0.0
          NETWORK_MASK: 255.255.255.0
          GATEWAY: 172.20.0.1
          DNS: 1.1.1.1

    ds: { mode: shared }

    fstab:
      - src: "172.20.0.1:/storage/one_datastores"

frontend:
  hosts:
    f1: { ansible_host: 172.20.0.6 }

node:
  hosts:
    n1: { ansible_host: 172.20.0.7 }
    n2: { ansible_host: 172.20.0.8 }
The table below lists some of the parameters, which you should update to your own deployment:
| Parameter | Description |
|---|---|
one_version |
The version of OpenNebula to install. |
ansible_user |
The user that will run the Ansible playbook. |
one_pass |
Password for the OpenNebula user oneadmin. |
vn |
Definition of the OpenNebula virtual network ("admin_net") that will be created for the VMs. |
PHYDEV |
The physical interface on the servers that will attach to the virtual to the virtual network. |
AR |
Address range (first IP and size) to assign to the VMs. |
GATEWAY |
Default gateway for the network. |
DNS |
DNS server for the network. |
f1,n1,n2
|
Ansible host IP addresses for the Front-end (f1) and Hypervisors (n1 and n2). |
ds |
Datastore mode. |
fstab |
The NFS share for accessing datastores, in <host>:<folder> format. |
The playbooks support all of the entry types supported by /etc/fstab, and include helpers to automatically link NFS folders to datastore folders. For example, you can use different NFS servers for different datastores:
    ds:
      mode: shared
      config:
        mounts:
          - type: system
            path: /mnt_nfs1/0
          - type: image
            path: /mnt_nfs2/1
          - type: file
            path: /mnt_nfs1/2

    fstab:
      - src: "10.2.50.1:/shared_one"
        path: /mnt_nfs1
        fstype: nfs
        opts: rw,soft,intr,rsize=32768,wsize=32768

      - src: "10.2.50.33:/shared_one"
        path: /mnt_nfs2
        fstype: nfs
        opts: rw,soft,intr,rsize=32768,wsize=32768
In this case, after running the playbook you will see the following structure created in each host:
root@ubuntu2204-18:~# ls -l /var/lib/one/datastores/
total 0
lrwxrwxrwx 1 root root 7 Jun 27 11:10 0 -> /mnt_nfs1/0/
lrwxrwxrwx 1 root root 7 Jun 27 11:10 1 -> /mnt_nfs2/1/
Note
The file (/mnt_nfs_1/2) will only be symlinked in the Front-end.
You can also define different fstab lists for each individual host, group or subgroup within an inventory:
frontend:
  vars:
    fstab:
      - src: "10.2.50.1:/var/lib/one/datastores"
  hosts:
    n1a1: { ansible_host: 10.2.50.10 }
n1a2: { ansible_host: 10.2.50.11 }For complete information on running the playbooks, please see Using the Playbooks.
To run the playbook, follow these basic steps:
-
Prepare the inventory file, adapting it to your needs. For example, update the provided
shared.ymlfile to match your infrastructure settings. -
Check the connection between the Ansible control node and the managed nodes. You can verify the network connection, ssh and sudo configuration with the following command:
ansible -i inventory/shared.yml all -m ping -b-
Run the playbook, for example from the
one-deploydirectory with the below command:
ansible-playbook -i inventory/shared.yml opennebula.deploy.mainAfter execution of the playbook is finished, your new OpenNebula cloud is ready. You can check the installation by following the Verification guide.
- Requirements & Platform Notes
- Release Notes
- Using the playbooks
- Reference Architectures:
- Verifying the installation
- Advanced Configurations:
- Additional Options:
- Developer Information: